The Both-Up formation is considered the best tactic in doubles play.
Playing at the net allows for better angles of placement and the ability to hit down at the ball.
The net feels lower and you can angle shots more sharply as you get closer to it. On the other hand, the net looks higher when staying back, and the possibility of creating sharp angles becomes more difficult.
Court coverage is better at the net since you can close out your opponents’ possible angles and reduce the distance and amount of movement needed to get to the balls. You must consider though that moving too close to the net means that your reaction time will be shortened. So there is a balance that has to be considered.
I recommend that you position at the net about halfway between the service line and net to wait for the ball and then move closer to approach the incoming ball if time is permitted (slow incoming balls give you more time to attack them and you can get closer to the net also).
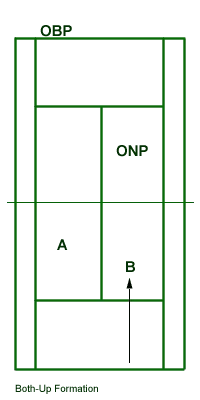
The major weakness of the BU formation is the backcourt. Having both players at the net, any player that can execute a good lob can put the net team in emergency mode.
But there are ways for the BU team to prevent the well-executed lobs (e.g. low and penetrating volleys, slice shots) and at the same time take advantage of the weak ones.
We can identify two ways to end up using the BU tactic: situational or planned.
– The Situational BU play occurs when the baseline player, during his cross-court ground-stroke rally, receives a short ball that upon returning doesn’t give the player enough time to back up. He moves up to join his net partner. At this point, I’d like to recommend that the last player who comes up to the net should stop (get in a ready position) a little further back than his net partner. (see graphic below)
This tactic will allow him to be the better player to cover an eventual lob.
Another situational net approach is when the ball is sent shorter (drop shot) on the baseline player’s side and he has to move up to get it.
– The Planned BU play is when the baseline player wants to come up to the net on any opportunity: serve and move up, return and move up to the net (especially on returning second serves), attack any short ball during the rally, etc.
Positioning at the net should be a little further back than his net partner (see the previous graphic) in order to cover the eventual lobs. The role of the net player closer to the net is to be the first to the balls that come down the center (in between the two players). The player further from the net backs up his partner (including being first to retrieve deep lobs).
Requirements for a successful play in the BU formation:
1. a comfortable level at executing volleys and overheads,
2. good communication,
3. quick reflexes,
4. an aggressive mentality.
1. Volleys and Overheads
a). Volleys
Consider the penetrating volley as the norm in putting the opposing team on the defense. By hitting deep and aggressive volleys, the opposing team is pinned to the baseline and makes their shots off of the back foot. It is very difficult to be lobbed when you hit deep, fast and low.
Execution:
To execute a penetrating volley successfully you must not think about swinging at the incoming ball. Most inexperienced players think that in order to hit an aggressive volley they have to take a big backswing.
I want to emphasize the importance of finding the ball and pushing through the contact. Finding the ball means that you place the racquet face in front of the incoming ball. Do not let the racquet pass the line of the shoulders. Once you “find” the ball, push the racquet face through the contact keeping the wrist slightly loose without letting it snap at contact. Do not confuse pushing the racquet through the contact with swinging through the contact. Swinging requires a follow-through, pushing means you stop shortly after you make contact with the ball. In this way, you’ll have time to set up for the next shot more quickly. The result is a fast-moving ball that makes the opposing team block it which is going to be ideal for your put-away angled shot.
Another type of volley that wins points at the net is the angled volley. These are executed in most cases as a result of a weak, high reply from the opponents. You must take advantage of the slow incoming ball and move up as close as you can to the net and pick up the ball above net level. In this way, you can create some short and angled-away winning volleys.
Let’s not forget about the touch volleys that the net team should also possess. They are the ones when you want to absorb the energy of the incoming ball and transform it into short, slow drop-shots. The drop/touch volleys can be the result of contacting the ball either above or below the net level. They should be directed away from the opposing up player and on the opposing back player’s side. Drop volleys require “soft hands” and very good hand-eye coordination to catch the ball right on the racquet’s sweet spot.
b). Overheads
You should be aware that one of the targets for your opponents, when you play attacking doubles, is the backcourt. That means… look out for the lobs.
There are a few cues to see them coming: opposing baseline player backing up, stretching for the ball, moving the body weight onto the back foot, racquet face open before contact, etc.
I suggest answering the lob with very aggressive overhead smashes (even if they go out or into the net). That transmits the message that you are not somebody who is afraid of lobs and also makes the opposition extra cautious and defensive the next time they throw up a lob.
Who takes the lob? Right or left player?
Obviously, if the lob is clearly on one of the player’s sides and he is in the position, then he should go for it. But what if the ball comes somehow in between the two players?
Considering that the backhand overhead is a lot weaker and more difficult to execute, the correct answer would be that the lob down the middle should be smashed by the player who has the forehand closer to the ball.
For example: if both players are right-handed, then it makes sense that the left-side player should smash the lob that comes in the middle of the court. An exception is a situation when the left-side player is off balance from a previous hit. In this case, the other net player should run around the backhand (if he has time) and go for it.
Placement-wise, hit all your overheads toward the closest opposing player or if you have the chance to contact the ball very close to the net then go for an angled smash (toward the alley and side fence).
2. Communication at the Net
First of all, I’d like to emphasize that once you’re at the net, things happen a lot faster (compared to staying at the baseline)… your reaction time is shorter.
Considering this, players should not think too much about whose ball is the one coming. I have always advised my students to go for the shot if they think they have a chance to reach it. Of course, they must consider not hindering their partner in this attempt. But too many times we see, at lower-level tennis matches, partners looking at each other (or worse, moving away from the ball) thinking that their partner should take the ball.
To avoid that, both players should embrace the incoming ball. I, jokingly, say to my students that instead of asking themselves whose ball it is (especially when it comes down the middle), they should just go for it and whoever gets it first, wins. :)
Also use simple cues when at the net, especially when time is so limited. “Mine” is the word that should be used more often. “Yours” is not one of my favorites; sometimes, saying “yours” is just an excuse to not take responsibility for your actions. Use the word “mine” mostly when you have time to decide who takes the next ball – like when a lob comes. Otherwise, when at the net, there is not too much time to talk… only to react, and the reaction should be that the player who is closer to the incoming ball should go for it. The other player backs his partner up by preparing for the ball too.
Don’t always expect that if your partner is in a position to intercept the ball he will make it… prepare for it too just in case your partner fails to contact the ball. I see this happening many times when the player for certain reasons misses the ball and his partner is totally watching and taken by surprise when this happens.
3. Quick Reflexes
Believe me: quick reflexes can be learned… I am not going to give you all the ways that you can do that, but I would like to point out just some of them that worked for me and my students.
In order to react quickly, you have to learn how to relax your body and mind. I know, it is hard to relax when you are in the middle of a fast exchange of balls at the net and the score is not in your favor. But take my word – the more you relax your body and mind, the better your reflexes and the faster your reactions.
To relax, start by having a loose grip on the racquet before the point starts. Loosen up your shoulders and arms too. Watch the ball or your opponents while breathing slowly and shallowly. Let your mind focus on what happens now and block any other distractions.
A good exercise that I used to practice before my matches was to lock myself in a quiet room (where I could not be distracted); I would spot a little object on the wall (or door, or furniture) – smaller than a tennis ball – then stare at it trying to keep my gaze from shifting away, for about 60 seconds. During this time, I would make an effort to keep my eyes fixed on the object and also to clear my mind of any thoughts. This helped me to keep my eyes on the ball later and stay calm during the point. It worked for me a lot. Try it and see the results… :)
4. Aggressive Tennis Mentality
To be blunt, playing aggressive tennis is not for shy players. You can try to come up to the net even though you don’t like playing aggressively but overall you will not be too successful. You have to love being aggressive (in tennis), love attacking the ball, and love to finish out points (as opposed to waiting for your opponent to miss).
If you would like to be more aggressive, you can start by doing some mental imagery where you see and tell yourself that you love the net and you love to attack the ball. It all starts with a state of mind. Visualize yourself being aggressive and you will, in time, become aggressive.
--------------------------
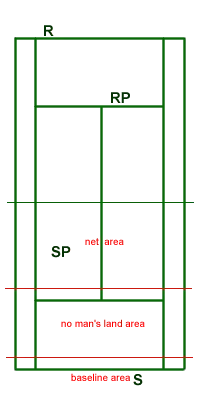
Look at the court as being divided into three areas: the baseline, no man’s land and the net area (see graphic above).
– The Baseline is where the point starts. But if your intention is to move up to the net behind the serve, then the baseline is like your starting place – Ready! (toss)… Set! (hit)… Go! (move towards the net).
– No Man’s Land is the space between about one foot inside the service line and a foot inside the baseline (see graphic). This is where the player should not be caught playing or at least not waiting for the ball. I like to call it a “transition” area – hit the ball and move either forward (towards the net) or back (to the baseline).
– The Net Area is the space between the net and about a foot inside the service line. This is where you want to get to in order to play aggressive tennis. The closer to the net the better, but you do have to consider covering the eventual lob too.
The transition to the net can be done either following the serve, the return of serve, moving up on a short ball during the rally, or lobbing the opposing net player.
1. Serve and Volley
a). Your transition to the net, to be a successful one, has to start with a “smart” serve…
Slice serves are the better option considering that the ball stays low (forcing the returner to hit up) and the spin also slows down the ball in the air giving the server more time to move closer to the net.
I suggest that you avoid high-bouncing kick serves when intending to charge the net because they make it easier for the returner to hit down at the approaching player’s feet.
Also, the placement of the serve should be as close as possible to the center line. Hitting the ball wide puts both the net player and the approaching server in a delicate position (by opening the court in all directions for the returner). But don’t do it all the time, vary the serve placement to keep the opponents honest.
As you deliver the serve, your forward movement has to begin right away. Toss the ball more in front to get some forward momentum.
b). Moving through No Man’s Land is the most difficult part.
Your job is to move up towards the net right after the ball has left your racquet. The next shot is frequently a low volley or half volley since the returner will try to put the ball at your feet.
So the first steps, after the serve is delivered, are going to be running steps. Then, as the returner is just about to hit the ball back, you should shorten your strides (stutter steps) and eventually get into a split step.
The split step is a small hop just before the opponent contacts the ball. It helps the approaching player gain his balance and be ready to push off in the direction of the incoming ball.
This split step, depending on the speed you delivered the serve, should occur somewhere around the service line (either inside or behind it).
A fast serve allows you to make just a few steps toward the net; a slower serve gives you more time to get inside of the service line, at least. That’s why in doubles you will not see very hard first serves for the simple reason that the server needs more time to get closer to the net.
So considering that the first volley (or half-volley) is done around the service line, this should be treated as an approach shot. Since this is a low one, all you want to do is keep the ball away from the net player and direct it deep toward the back player.
Keep the ball away from the opposing up player but at the same time, you should try to make it land not very wide either.
Execution: right after the serve is delivered, make sure you have the grip on the racquet ready for a low volley. Keep the racquet face in front of the incoming ball and get your body low (from your knees). Catch the ball on the racquet face and push it gently without any back-swing or follow-through. An important role in executing the low volley is to get low – eyes close to the ball.
c). Once the first volley (or half-volley) has been successfully delivered deep to the opposing baseline player, your next job is to move beyond the service line and position at the net. Split step and get ready for a higher volley. Hands hold the racquet out in front, relaxed.
2. Serve Return and Approach
To move up to the net on the serve return you will have to take the ball on the rise. Position yourself inside the baseline in order to do so. Use a very short back-swing and meet the ball out in front then let the momentum carry you forward.
You also have to adjust the return placement according to what the server’s intention is – stay back or charge the net.
If the server decides to stay back, then attack the ball and push it deep, floating and cross-court. Or you can chop-and-charge: hit a drop shot on the baseline player’s side.
If the server comes up to the net, return down to his feet, making the ball land in the service line area. Your serve return should be made with three goals in mind: keep the ball away from the opposing net player, give you time to move up (slow), and make the server hit the ball up (low).
3. Moving up on a Short Ball
This is a running shot that gives you forward momentum going into it.
Same as the previous shot (serve return and approach), your goals are: keep it away from the opposing net player, send it deep and low and also make it float (underpin) so you have more time to get up to the net.
As you move up, stay behind the path of the ball in order to close out your opponent’s possible angles.
Placement-wise, you are looking to either send the ball deep toward the opposing back player or drop shot away from the opposing up player. Avoid hitting the ball to the mid-court because this gives the opposing back player a chance to attack it aggressively back to you.
4. Lob Approach
This is an exciting shot to make considering that it gets the opposing team switching positions and gives you plenty of time to move up to the net (if the lob is successful).
Your lob shot should be aimed over the net player that is in front of you, and deep to the baseline. Make sure that you wait to see that it clears the opposing net player before moving up. Otherwise, you can find yourself in front of a “cannonball” aimed at you or your net partner.
If the lob is successfully executed, as you move up to the net, expect to get another lob back as a reply. Communicate with your partner early about who is going to take the overhead (while the ball is coming back to your court). Consider that the player whose forehand is closer to the center takes the overhead aimed between the two of you.
Execution: The lob can be done with topspin when you are set up and have plenty of time to get under the ball, or flat and under-spin when you just want to block a fast incoming shot.
-----------------------
Once a player joins his partner at the net, he should position himself about 1-2 feet further back. In this case, the slightly further back player knows he will be closer to chase a deep lob, and more important when the ball is sent in the middle of the court, the closer player will be first to attack the volley (the other one will back him up just in case he misses).
This avoids the confusion of who takes the incoming ball and improves the decision-making ability.
When both players are up at the net, the gap between the two is obviously a lot smaller compared to the one-up-one-back formation.
How close the two net partners should stand from each other?
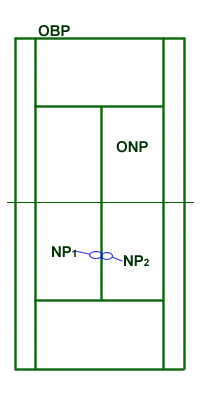
Here is a simple exercise to see how close the players at the net should be from each other: have the two players stretch the inside arms (arms closer to the middle of the court) towards the center and with the racquet in their hands; their racquets’ tips should touch (see graphic below).
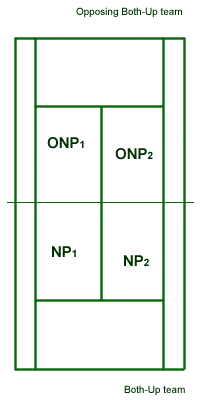
Here we have four players (two teams), at the net, exchanging volleys (or half-volleys) when quick reflexes and excellent hand-eye coordination are at their highest.
To be successful playing at the net against another team that is already at the net, you and your partner must look for one thing: make the opposing team hit up. Once they do that, you go for the winner.
How do you make the other team hit up?
First of all, make sure you don’t stay too far back. More incoming balls will land down at your feet if you stay far from the net. Position yourself closer to the net and move into the ball every time it comes your way. By being closer to the net, you get to hit the ball down and the opposing team hits up.
Make sure that you keep the racquet in front of you and take no backswings at the incoming balls.
You want to be very efficient with your strokes – quick to hit and quick to get set for the next one.
What if the other team manages to place the ball down low in your direction?
Consider sending the incoming low ball (where contact is made below net level) always cross-court. In this way, you will clear the lowest part of the net and there is more court for the ball to travel through and come down. Choose to send a low ball down-the-line only if the front player is off balance, recovering (wrong-footed), or if the side is covered by a weakness. Otherwise, hit the low ball cross-court.
What to do with the high incoming ball?
Put it away! Hit it to the closer (front) player’s feet; between the two players; angle it, etc. A high ball begs for a winner. Don’t disappoint it. ?
Be careful not to over-hit it. A big swing is not necessary, just make clean contact above the net level, close to the net, and a punch well placed (low to the feet) should do it.
-----------------------------
Both-Up vs. One-Up-One-Back
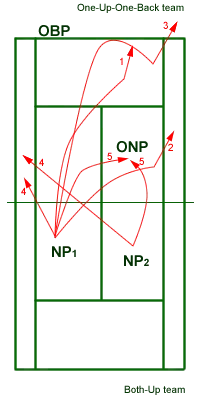
So you want to use the strongest strategic formation against the weakest formation and you wonder how to win? :)
Well, here are some of the weak spots that the OUOB formation exposes for the BU team:
1. Hit through the Gap (the area between the net player and baseline player)
As you can see in the attached graphic, the OUOB team exposes a wide opening (the Gap) for the two opposing players at the net. In fact, this area is wider for the NP1 (net player 1) since he is able to hit cross-court, through it.
2. Angled Shot to Net Player’s Alley
This is more easily done when the incoming ball is higher and you catch it very close to the net. I would not suggest hitting it too aggressively – just focus on making the shot and placing it by the net player. Be aware that it is not such an easy shot to make – hitting down on the incoming ball sometimes sends the ball straight into the net. Open the racquet face a little and push the ball aiming for the singles sideline and about halfway between the net and service line.
You don’t need to hit it too hard for the following reasons: swinging might make you lose ball control, the distance between you and the opposing net player is very short so he will not have enough time to react to the ball anyway, and last, the opposing net player might just turn around to protect himself from an aggressive ball coming from such a close range.
3. Lob Volley over the Net Player
A low percentage shot and exciting to make, the lob volley should be done mostly by the cross player (player NP1 in the attached graphic) since this can be a winner if properly executed. If done by the player facing the opposing up player, all it does is make the other team switch positions.
4. Angled Short Shot to Baseline Player’s Alley
This is, again, a choice that should be made if the contact with the ball can be made very close to the net and high. This allows a short-angle put-away shot by either of the net players.
Another choice could be the drop shot on the baseline player’s alley but it has to be very well executed because if the ball can be reached by either opposing player they can do damage to the net team. So choose the drop shot very carefully – when the net or baseline players are off balance or recovering.
5. Hitting toward the Net Player’s Lower Body
The best tactic to use against the OUOB formation when your team is at the net: attack the opposing net player. Better yet, if you are quick and catch the ball above net level, send it toward the opposing net player’s feet.
So when looking out for high volleys or overheads… make it a rule: everything that comes high, you should catch early (before it drops below net level) and hit directly towards the closest opposing player’s lower body. Most of the time this tactic will produce a winner. Otherwise, if you hit the ball back to the opposing baseline player, the rally continues… I don’t think you want this.
-------------------------
Both-Up vs. Both-Back
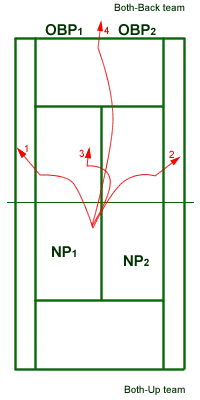
If you and your partner find yourself playing at the net against a team that prefers the baseline, you are looking at four targets to create some “damage” (see the graphic above):
1. angled shot to the left,
2. angled shot to the right,
3. drop shot,
4. deep down the center.
As the team at the net, you and your partner will obviously look to put the ball away as soon as you can. But some circumstances require that you wait before you hit the winner:
– when you are too far from the net,
– the contact with the ball is low,
– you get a lob to the backhand side,
– your opponents are in a good position to get to your shot.
All these situations require that you prepare the winning shot by hitting a “set-up shot” first. A set-up shot is basically anything that forces the opposing players to hit the ball up or “float” a slow-moving ball over the net. It could be a deep ball, an angled ball, or a shot down at the opponents’ feet, etc.
So most winners should be preceded by one or two set-up strokes. Don’t try to win the point right away, wait for the opportunity.
If you manage to bring them to the net, try to keep them there longer. They will attempt to get out of that position since this is not their comfort zone.
Movement:
Move together and, very importantly, always follow the ball with your feet: stay behind it (e.g. if the ball is sent wide to the right then the net team moves slightly to the right also). Imagine a string attached to the net players – when one player moves to the left, the string pulls the other player to the left too. Work in sync.